Showing posts with label crafts. Show all posts

Tuesday, February 22, 2011

A (re)Purpose Driven Life


I like to recycle. Even better, I like to reuse and repurpose (meaning the stuff sticks around, just in another useful form).  One way I like to do this is by being all craf-tay.
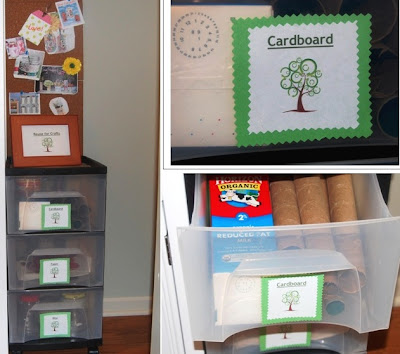
We have a very small craft room, and I recently carved out a space for a recycle area. I took an old plastic storage tower we had lying around and put it to good use by jamming it in the last 2' of space and filling it with 'trash'. Yay, me! *sarcastic snort*

I made three little labels (Cardboard, Paper, Misc) and spray mounted them onto each drawer. I used a clip art recycle graphic for the labels and for a frame that sits on top of the bin.  I think the frame is really a nice directional for my husband, so he knows where to put things (if he dares to enter). Also, I vow if all bins are full...there shall be no overflow! We'll accept more ONLY when there's room. You hear me? Oh & I don't want any toilet paper rolls (ewe).

Lastly, I added an inspiration/idea wall above the recycle bin from some leftover cork squares. On this wall I display pictures of recycled craft ideas that I like.  I love the tin cans for herb pots/May Day gifts, jar votive, jar flower vases and candy holders, bird feeders and of course, all the cute kid projects (can't wait to try out the milk carton boats).


There are many sites that offer info on how to craft with recycled items, just Google.
Kaboose  is one my favorite such sites, they do a great  job with index/search by specific recycled item.  Also, Re-Nest is a favorite spot & they have a great list of 50 creative reuse ideas.

It doesn't take much skill, time or money (can be free) to create a recycle craft area in your home. This also teaches kids about recycling/repurposing & you'll have fun making crafts/gifts together!
p.s. for the last several years I've been trying to reuse/repurpose these metal buckets as used in our wedding (pics below). I've given them filled with cookies, muffins, flowers, birthday gifts, Halloween/Easter treats..anything and everything. I know  my friends and family will be VERY disappointed, BUT...


the LAST bucket leaves tomorrow, filled with baby gifts for a friend.


Sunday, February 6, 2011

Sending All My Love

 
I love these little mailboxes from Pottery Barn Kids.

How cute would it be for a kid to have their own mailbox for Valentine’s Day? To use each year, filled with valentines from loved ones as they come in the mail & a gift from mom/dad on the big day?
I  thought this would be a FAST/easy project (and it was), so here’s what I came up with:
  • One metal mailbox from Joann’s craft store ($3.99)
  • One long candle holder from thrift store ($2.00)
         You could use a shorter candle holder to place on table, or skip using one all together.
  • One initial letter from Joann’s craft store ($1.79)
  • White spray paint
  • Some red, white & pink felt (cheap at around 29 cents a sheet)
  • Fabric glue
  • Glue gun (or you could use all purpose glue or gorilla glue to attach decorative elements)
  • A festive button
  • Some festive fabric scraps
  • Pinking shears (these scissors really make all the difference with this project)
  • Regular craft scissors

First, I spray painted the initial, candle holder and wood knob white.

Then I cut & knotted fabric scraps around the flag arm, alternating patterns.  I then embellished the flag with felt hearts, glued together with fabric glue (pink felt was cut with pinking shear for decorative edge). I used the hot glue gun to adhere to the flag.
 I cut out some larger hearts from felt & glued a button on top of them, then hot glued it to the mailbox. Next, I glued the initial to the other side of the mailbox, added a felt owl I had on hand & glued the knob on the front. Lastly I screwed the mailbox to the top of the candle holder (just in case the glue decided not to hold).
Ta-Da!
Of course, this can work for boys too! Just choose different colors/themes.

As a lil' extra, I made a quick felt envelope to put inside (super easy). I sewed two pieces of felt together (you could just use fabric glue on the edges & skip the sewing). Cut out a little 'stamp' with pinking shears and put them down with fabric glue. I then slit an opening in the back so it can hold small gifts. I glued fabric scrap over the opening as trim.  It’s not perfect, but looks like it was ‘made with love’ and that’s all that matters, right?


Thursday, February 3, 2011

You Melt My Heart

Yesterday, while we were making the crayon heart garland, we decided to melt the leftovers  for festive heart crayons. Super easy and again, a great way to give new life to those busted crayons.
We used some small silicone cupcake hearts for our molds. You can use tins and different shapes/sizes too.


Bake at 300 for 5-7 minutes (or until the crayons look melted). Let cool and then pop out.


Pair them with a customized coloring sheet via Crayola Play Zone (FREE!, with code found in in crayon boxes).  You can also do this on your own computer in photo editing, by selecting 'sketch' in special effects. Picnick also offers free photo editing online (no obligation), where you can edit your photo the same way for printing.

Here's a photo I did on Crayola.


To give as a gift, you can roll the coloring sheet, tie with festive ribbon
& attach the crayons.

A sweet little gift any Valentine would love.


Wednesday, February 2, 2011

Wewax, I Heart You!


Wax crayon heart garland. It’s so stunning when you hang it where the sun can stream through. If you do any Valentines Day project with your kiddos this year, do this one! It's truly breathtaking and worth the effort. Plus, you can string them up again next year.


Here’s what you need:
Crayons (really good use for those broken crayons) *note, washable crayons DO NOT work.

A grater or pencil sharpener (we used a pencil sharpener)
Wax paper
Two pieces of heavy craft paper OR two towels you don’t care about
Iron
Hole Punch
Scissors
String
Glue

Peel the crayons: You can soak crayons in water (for about 3-5minutes) to easily remove wrappers, or use an x-acto knife to score the paper and peel off.
Lay down your towel or craft paper. We taped ours to the work surface with masking tape. Lay wax paper on top of towel or craft paper.  I used a 12-by-16-inch piece of wax paper and folded it in half to mark the middle point.

Shave crayons using pencil sharpener or grater. Goal is to have fine pieces of crayon wax.

Spread shaving bits evenly on right half of wax paper.
Fold left side of wax paper over and fold up corners.
Place your second piece of craft paper (or towel) over the top and iron on low setting (keep checking to see how the wax is melting.
Let cool. Trace and cut heart shapes. You can use varying sizes or just one size heart.


Punch holes. Add string (we added varying lengths of string for a staggered effect).
We reused the craft paper to hold the stringed hearts, simply fold over and add a line of glue.
Hang on a window where the light shines through best. Enjoy!

Sunday, January 30, 2011

Tweats for Tweets


Let's not forget our feathered friends this Valentine's Day, especially when food is so scarce in the winter months.This is a fun project to do with the family & one you will repeat for years to come  (due to its simplicity). Kids love to watch birds flock to the yard to enjoy these creations.


Here's what you need (you can make larger batches or smaller as you need):
3 cups birdseed
2 – 1/4 ounce unflavored gelatin packets
cookie cutters or a mold (you can also form shapes with tinfoil)
twine, ribbon or string of some kind
1 drinking straw

Place two gelatin packets in 1/2 cup cold water.
Let the gelatin sit for a few minutes until it has absorbed the water (it will look like jelly). 
Heat 1 3/4 cups water in a pan, then pour in the gelatin mixture.
Stir until dissolved.
Stir in your 3 cups birdseed, making sure all seeds are coated.


Allow mixture to cool, then scoop into your cookie cutter/shapes (I put shapes on wax paper/cookie sheet).
Place drinking straw in the shapes to make opening for string.
Make sure your hole is closer to middle of the shape, so the string will not rip through once hung.

Place in fridge or freezer (I placed in freezer for one hour), so that the gelatin forms and bonds the birdseed.
Lastly, add string, hang outdoors and enjoy!


These also make great gifts for the bird lover. To keep, just wrap in cellophane and refrigerate.

Tuesday, January 25, 2011

Phonic-Aholic

Now that we know our alphabet by sight (and song), it’s time to learn the sound each letter makes.
Here’s an easy way to make learning phonics fun with your tot. I have seen different basket versions of some in the Montessori style (class setting) that use cards, wooden letters and even small toys. Here's our inexpensive and easy phonics kit in a box.


I purchased this box from a craft store for about $10. I’m sure any craft store (or even Wal-Mart or Target) would have one. It's a small hardware box or jewelry making/bead box. It has 30 mini drawers (more than we need), and the inside of each drawer is about 3” long and 2” deep.
I printed upper and lowercase alphabet letters, cut them out and used clear packing tape to adhere them to the face of each drawer.
I filled each drawer with the corresponding letter (cheap plastic magnet letters) and toys/ figurines that begin with the corresponding letter/sound.  

For instance, the P drawer has:  
One plastic letter P, a small  parrot, pineapple, penguin, panther, pin and phone.

I scooped up grab bags from a local thrift store that contained 100+ small toys/ figurines and asked family and friends to help me fill the drawers I was missing items for ($3 and free).
Before placing them in action, I washed and sanitized each one.  You can wipe, boil, scrub or toss them in the germinator...whatever you do, I highly recommend you sanitize if you've purchased second hand.
Lastly, we use a square piece of felt as a mat (50 cents at craft store), to work on. Each day we choose a new letter, lay it on the mat and make our sounds.


You can take all the letters out and ask your tot to put each one back in the correct drawer, and  do the same thing with the items in each drawer. There are many ways you can use this phonics box and it will be relevant for several years.
This is a learning tool at our house, not a toy.  Due to small parts, we keep it out of reach when we aren't working on it together. 

Have Phun!

Thursday, January 20, 2011

Snowed In! Fun and Free Boredom Busters!

Snowed in with kids? 
Here are a couple of ideas to keep them busy, teach them about nature and have a little fun outside too!

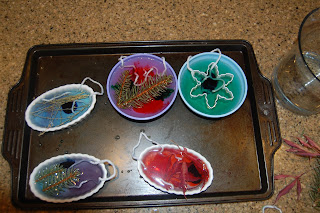
Frozen Sun Catchers


Go outside and gather some items from winter nature.
We gathered pine needles and pretty leaves. We couldn't find any berries, but they would have been a great addition.


Place the items in bowls or other containers and cover them with water. To jazz them up, you can add a few drops of food coloring. You can also sprinkle in bird food.


Submerge some string for hanging & set outside to freeze. *Note* put them someplace shaded from the sun while they freeze. This is also a good project to do before bed, so you have them as a frozen surprise  in the morning!


Once they are frozen solid, hang them outside where you can see them. They are so pretty when the sun hits them. If you used bird food, they will be enjoyed by the birds when the sun catchers melt.


Paint the Snow!
Fill squeeze bottles and spray bottles with water and a couple drops of food coloring. Go outside and paint the snow! We had a blast doing this. Although, I think my girl had more fun running through my art than making her own!