Sunday, January 30, 2011

Tweats for Tweets


Let's not forget our feathered friends this Valentine's Day, especially when food is so scarce in the winter months.This is a fun project to do with the family & one you will repeat for years to come  (due to its simplicity). Kids love to watch birds flock to the yard to enjoy these creations.


Here's what you need (you can make larger batches or smaller as you need):
3 cups birdseed
2 – 1/4 ounce unflavored gelatin packets
cookie cutters or a mold (you can also form shapes with tinfoil)
twine, ribbon or string of some kind
1 drinking straw

Place two gelatin packets in 1/2 cup cold water.
Let the gelatin sit for a few minutes until it has absorbed the water (it will look like jelly). 
Heat 1 3/4 cups water in a pan, then pour in the gelatin mixture.
Stir until dissolved.
Stir in your 3 cups birdseed, making sure all seeds are coated.


Allow mixture to cool, then scoop into your cookie cutter/shapes (I put shapes on wax paper/cookie sheet).
Place drinking straw in the shapes to make opening for string.
Make sure your hole is closer to middle of the shape, so the string will not rip through once hung.

Place in fridge or freezer (I placed in freezer for one hour), so that the gelatin forms and bonds the birdseed.
Lastly, add string, hang outdoors and enjoy!


These also make great gifts for the bird lover. To keep, just wrap in cellophane and refrigerate.

Saturday, January 29, 2011

Play Kitchen- Repurposed Entertainment Center


After searching high and low for a cute play kitchen for my girl, I decided it couldn't be found...what I wanted anyway, (reasonable price, real wood).  Pottery Barn and Land of Nod had cute wood kitchens (but, cha-ching! $$). I could remodel one grown up kitchen for the price of those things (gulp)!

Luckily, I stumbled upon a feature that Ohdeedoh did on homemade play kitchens. They featured some awesome repurposed play kitchens that were made form  nightstands, bookcases and end tables. They were all very inspiring and cute. This is what I wanted to do and I would convince my husband that he wanted it too!

So I mapped out all the details (sketched and made lists) and convinced my husband that it would be an EASY task (2 months before Christmas).

I found a solid walnut entertainment center on Craigslist for $30.
I removed the glass door, cabinet doors and sanded everything down.

Here's the before picture:


We then cut the hole for the sink. We cut the circle opening about 1/2" smaller than the bowl (steel mixing bowl), so that the lip of the bowl would overlap the opening slightly.

Then I painted the unit with a primer/paint all in one (paint we already had on hand).
I gave it two coats.


I used a stainless metal bowl for the sink and a free faucet someone had gifted us. I found cheap, round  wood plaques at a craft store and painted them with leftover paint. I painted the swirl (heating element on burner)  with  aluminum spray paint, as I did the knobs and the oven rack


Then I attached burners with liquid nail. We used wood drawer knobs  for the stove knobs and used washers and screws so that they really turn.

We replaced the fridge door with a new door, added some shelves inside the fridge and added a plywood backing to the entire unit. I found  a cheap dish drainer to act as the dishwasher and cheap storage rack to use as fridge door shelves. We cut a hole in the oven door and used clear plexi  glass for the oven door  window.

I used a $5 key rack as the utensil rack an a floating shelf to hold mixing bowls. I decided not to put the door back on under the fridge. - Instead,  I used a tension rod and made simple curtain panels (spotted owl fabric) for this area (this is where we store pots and pans), and for the window curtain.


The window is a dollar store picture frame 8x10. I took the glass out and replaced it with a plexi material. We hung it, so if she ever wants to swap out the scenery, she can.
I used a regular metal curtain bracket to hang the curtains above the window (we had to use metal saw to cut the length down in size).
I  found a cheap chalkboard ($2), I painted it to match & then glued with liquid nail.  
I also found a click light for $6 that we placed above the sink & a cute little scrubber brush that looks like a flower/vase.


I made some felt food (which is super easy) and a friend made some for us as well.

Lastly, I added a little hook on the side, to hold aprons and oven mitts. It was a 79cent wood owl from the craft store and I glued on a leftover knob.


My girl wasVERY excited to see her kitchen on Christmas morning and she continues to play with it daily. My brother, who is a professional chef, has already been over to test it out. He taught my girl how to make a rue and toss a great salad!

THANKS to my husband for the LOADS of patience he kept through this entire process (and for the many late nights). Also, thanks to the best Father In Law in the world for all of his advice, help and TOOLS!


This project is featured on Ohdeedoh!


I hope I get to see my grandchildren play with this someday!

Friday, January 28, 2011

Two Lips and Lots of Heart

Okay, so I love Valentine’s Day. I love decorating for it. I love fresh flowers too.These festive arrangements at Flowers.com & Martha Stewart really caught my eye.
 

I love the concept of conversation hearts with flowers, super cute.
However, $60.00 for floral arrangement is a bit ‘blue blood’ for my budget.
So, I thought I would try to make something similar for much less.

Here's how it turned out:
I would have really liked to find muted tulips for this, but I made do with what was available.
 I might refresh with different colors closer to V- Day
.

This is what I used:
- Two 9oz bags of  conversation heart candy ($5).  You can also use heart shaped red hots or other festive candy. You may use less or more depending on the size of your vase.
- One clear vase and smaller bud vase  (FREE, I already had these).
You can use any small container to set inside the vase (a drinking  glass or smaller bottle), just as long as it’s the same height and thinner than the vase. Also, Hobby Lobby has nesting vases for cheap ($2.99-$4.99).
- One bunch of purple and one bunch or dark pink tulips ($14.00)
You can use whatever kind of flower you like!


1. Fill your inner container half way with water
2. Cover the inner container top with saran wrap or foil, center in vase
3. Slowly pour your candy around the inner container until the vase is full
4. Remove the saran wrap
5. Band your flowers & cut
Cut your flowers at an angle with a sharp knife


6. Leaving the band on, put flowers in inner container & arrange to your liking.
You can carefully fold and tuck leaves under for more fullness, or leave them out.


This arrangement will last 7-10 days.
$20 for a fun & festive arrangement, plus you can reuse the conversation hearts next year (just keep them away from candy eaters). 


Wednesday, January 26, 2011

My Missing Link

During my ‘Great Closet Cleanup’ I unearthed this ancient relic (circa 1985-88?).
It’s got a decent patina and it's a miracle that I still have it after all these years (I won't say decades. I just won't! Er, crud…I just did).
Somehow, I've managed to schlep this necklace between 1 childhood home, 7 apartments,
1 duplex, 1 loft, 3 adult homes and 3 states.

Do you remember when these friendship necklaces were a VERY big deal?  
They meant something.
They weren’t collected, worn in layers, overly traded or easily obtained.
These necklaces were highly regarded friend flair.
One necklace was split between two best friends and proudly worn and cherished by both. Once you had a best friend and were labeled as such, you couldn’t be best friends with anyone else. They were symbols of a great and true friendship that could NEVER be broken or forgotten.
That being said, who the heck has the other half of this old thing?  
I can maybe narrow it down to two or three people, I think.  KR,  RM or AT (for privacy reasons and reasons of potential embarrassment, I won’t spell out complete names).
How broken would I be if I find said owner, only to discover that they DIDN’T keep their half?
What if I've been replaced and they have a NEW best friend?  I don’t handle rejection well.  
I might just shine this lil’ gem up and wear it proudly.
I am my OWN best friend… wearing a missing link pendant, and likely a soon-to-be green neck.

Tuesday, January 25, 2011

Phonic-Aholic

Now that we know our alphabet by sight (and song), it’s time to learn the sound each letter makes.
Here’s an easy way to make learning phonics fun with your tot. I have seen different basket versions of some in the Montessori style (class setting) that use cards, wooden letters and even small toys. Here's our inexpensive and easy phonics kit in a box.


I purchased this box from a craft store for about $10. I’m sure any craft store (or even Wal-Mart or Target) would have one. It's a small hardware box or jewelry making/bead box. It has 30 mini drawers (more than we need), and the inside of each drawer is about 3” long and 2” deep.
I printed upper and lowercase alphabet letters, cut them out and used clear packing tape to adhere them to the face of each drawer.
I filled each drawer with the corresponding letter (cheap plastic magnet letters) and toys/ figurines that begin with the corresponding letter/sound.  

For instance, the P drawer has:  
One plastic letter P, a small  parrot, pineapple, penguin, panther, pin and phone.

I scooped up grab bags from a local thrift store that contained 100+ small toys/ figurines and asked family and friends to help me fill the drawers I was missing items for ($3 and free).
Before placing them in action, I washed and sanitized each one.  You can wipe, boil, scrub or toss them in the germinator...whatever you do, I highly recommend you sanitize if you've purchased second hand.
Lastly, we use a square piece of felt as a mat (50 cents at craft store), to work on. Each day we choose a new letter, lay it on the mat and make our sounds.


You can take all the letters out and ask your tot to put each one back in the correct drawer, and  do the same thing with the items in each drawer. There are many ways you can use this phonics box and it will be relevant for several years.
This is a learning tool at our house, not a toy.  Due to small parts, we keep it out of reach when we aren't working on it together. 

Have Phun!

Thursday, January 20, 2011

The Urge to Purge!

I’m not bulimic. I am overstuffed. With stuff.

Come January each year, I try to focus on de-cluttering. What a great time to do it, a fresh new year! Sounds great, right?
Unfortunately, I haven’t done this in 2 years (which perfectly coincides with the fact that I have a 2 year old child). An excuse...for once, not so much. This little creature has brought her own entourage of clutter into our home that we must also deal with. Nobody tells you how much gear a baby comes with...and how fast it multiplies!
I have a history of being a very organized (type A) person - with some creative 'flair'. The organized part has gone haywire ever since I became a mom. Keeping a child alive and happy, plus sleeping and showering has caused de-cluttering to be absent from my short list.
So, now I am facing down a dreaded monster sized project- out of necessity. The master closet for starters, it's a train wreck. When guests come over, I close the door. Okay, I don't simply 'close' it. I have to push it shut using my back and leg muscles... and if I'm lucky, it shuts on the first try.
 My poor husband has been relegated to the guest room closet, seeing as I cannot offer even a smidgen of space in the master closet to him.
His poor shirts, ties and slacks…ALL ALONE, separated from my blouses, dresses, massive quantity of shoes, coats, blazers, jackets, trench coats, sweaters, skirts, scarves, handbags, hats, jewelry, perfume, makeup, maternity clothes (I’m not pregnant)…the list continues. Plus, there’s a bunch of stuff in there that doesn’t belong. Why would there be a new dish scrubber  in there, or a pack of toothbrush replacement heads? You got it, it's the catch all...er, my catch all.
So, I'm reclaiming the space (maybe some of my sanity) and starting with this:

KEEP: 
It fits. I wear it. It's useful and I love it.
WISHFUL THINKING:
It's too freakin' small... but I love it! Tough one. I'll get back to this.
DONATE:
Easy enough. Don't want it. It will make a nice donation and somebody ELSE could love it.
FIND A HOME:
This is stuff that is useful, it just doesn't belong in the closet!
CHUCK: Trash.
I envision a few rounds of these tubs and then I will have to deal with the Wishful Thinking pile.
If this project takes me a month, perhaps I can lose a few LB's in that time, and be able to squeeze into the Wishful Thinking clothes!  
Sounds perfectly reasonable, right?  Wishful thinking...

Snowed In! Fun and Free Boredom Busters!

Snowed in with kids? 
Here are a couple of ideas to keep them busy, teach them about nature and have a little fun outside too!

Frozen Sun Catchers


Go outside and gather some items from winter nature.
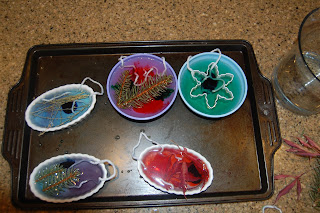
We gathered pine needles and pretty leaves. We couldn't find any berries, but they would have been a great addition.


Place the items in bowls or other containers and cover them with water. To jazz them up, you can add a few drops of food coloring. You can also sprinkle in bird food.


Submerge some string for hanging & set outside to freeze. *Note* put them someplace shaded from the sun while they freeze. This is also a good project to do before bed, so you have them as a frozen surprise  in the morning!


Once they are frozen solid, hang them outside where you can see them. They are so pretty when the sun hits them. If you used bird food, they will be enjoyed by the birds when the sun catchers melt.


Paint the Snow!
Fill squeeze bottles and spray bottles with water and a couple drops of food coloring. Go outside and paint the snow! We had a blast doing this. Although, I think my girl had more fun running through my art than making her own!


Monday, January 17, 2011

An 'Aldi' but Goodie!

When I was a kid, we were a family on a very tight budget, so my parents shopped at Aldi.  What I remember about Aldi is hot dogs, potato chips, white bread, giant bags of potatoes, carnation powder milk and orange soda.  

Aldi is a deep discount grocery chain, with mostly off-brand items and a label of their own.  They don’t spend money on much floor space, signage or advertising, so their overhead is low.
I haven’t really been to an Aldi since, until recently.  There isn’t one located near us, so I stopped in  one while on an errand. To my surprise, it’s not exactly the same Aldi I remember as a kid. Even a grocery snob could love the Aldi of today.  Organic items, whole grain items and even some name brand items for great prices. They’ve got a new label called Fit N Active that’s comparable to Kashi, NutriGrain and other well known brands, for less than half the price.
Here’s what I snagged for $25 (all the cash I had in my pocket): 

Box of whole grain rotini
Box of whole wheat penne
Box of whole wheat spaghetti
A fresh pineapple
A can of 100% natural pineapple
100 calorie packs roasted almonds
Box of organic green tea
Box of whole wheat crackers
Box of whole grain fruit bars
2 avocados
100% pure organic pomegranate plum juice
100% pure can of frozen cranberry juice
Yogurt covered raisins
2 bottles of wine. $2.99 bottle of wine??! Say what??  Yes, it’s called Winking Owl. I did buy it because I loved the lable. It’s pretty tasty and already has good reviews online. A fun surprise. 


I could hardly believe it. Only $25 for all of this? This would have cost me at least $45-$50 at Hen House, Hyvee or Price Chopper. Wowzah.

After some research, I discovered Aldi is originally a European discount grocery store chain. They have stores in Spain,  France, Germany, Switzerland, Australia and of course several hundred in the United States. If you see one, check it out…oh, & bring your own bags.